The Art of Neapolitan Pizza Making: From Dough to Oven
There’s something truly magical about Neapolitan pizza. It’s more than just sustenance; it’s a piece of history, a craft honed over centuries in the vibrant streets of Naples. Forget everything you think you know about pizza for a moment. This isn’t about overloaded toppings or thick, doughy bases. True Pizza Napoletana is an art form, recognized by UNESCO as an Intangible Cultural Heritage and protected by stringent rules like the TSG certification. It’s a journey that begins with the simplest ingredients – flour, water, salt, yeast – and culminates in a fleeting, fiery transformation within a blistering wood-fired oven. Understanding Neapolitan pizza is understanding the very soul of Neapolitan cuisine.
Crafting the Perfect Neapolitan Dough
The Essential Ingredients
Everything starts with the dough, the living foundation upon which Neapolitan pizza is built. Its beauty lies in its profound simplicity, yet achieving perfection requires discipline and adherence to tradition. The official guidelines, meticulously maintained by the Associazione Verace Pizza Napoletana (AVPN), are incredibly specific about the ingredients. We’re talking high-quality wheat flour, typically Italian ‘Tipo 00’ or ‘Tipo 0’. These flours are characterized by medium strength (a W value between 250–320 is often specified) which provides the perfect balance of elasticity for stretching and softness in the final product. Water, sea salt (around 40-60 grams per liter of water), and a minimal amount of yeast – either fresh brewer’s yeast (0.1-3 grams per liter), a natural starter (‘lievito madre’), or dry yeast in precise ratios – complete the quartet. Critically, authentic Neapolitan dough contains no fats like oil or sugar, allowing the pure flavour of the fermented wheat to shine through. In my experience, sourcing the right flour is absolutely paramount; it dictates the hydration, the texture, and ultimately, the pizza’s character.
Mixing and Kneading Tradition
The mixing process itself is governed by tradition. You start by dissolving the salt in the water – this is crucial. Only then do you begin incorporating the flour (typically 1.6-1.8 kg per liter of water, depending on absorption), adding the yeast partway through to avoid direct, prolonged contact with the salt, which can inhibit its activity. Whether kneaded by hand, which connects you intimately with the dough’s transformation, or using a low-speed mixer (fork, spiral, or dipping arms are specified by AVPN), the goal is the same: to develop the gluten structure gently until the dough reaches the ‘punto di pasta’ – the ideal point of elasticity and smoothness. It’s a feel you develop over time, knowing instinctively when the dough is just right, pliable but strong.
The Magic of Fermentation and Maturation
Once kneaded, the dough begins its slow, magical transformation through fermentation and maturation. This isn’t a process to be rushed. The dough is typically allowed an initial rest, followed by dividing and shaping into balls (‘panetti’), and then a longer leavening period. The entire process, including the initial kneading and rests, often spans from a minimum of 8 hours up to 24 hours, as detailed in the AVPN regulations. This extended period, often involving a slow rise at room temperature or even a cold fermentation in cooler temperatures as suggested in some modern home baking interpretations like those from King Arthur Baking, is absolutely critical. It allows enzymes to break down complex starches and proteins, developing profound flavours and making the final pizza remarkably light and digestible. You’re not just waiting for the dough to rise; you’re cultivating flavour and texture.
The ‘staglio a mano’ – the hand-division of the dough – is another traditional step where the bulk dough is expertly portioned into individual balls, known as ‘panetti’. These typically weigh between 200 and 280 grams each, a weight range designed to produce pizzas with a final diameter of 22-35 cm. The technique often involves a motion reminiscent of making mozzarella, hence the term ‘mozzatura’ sometimes being used. These perfectly formed ‘panetti’ are then placed in rising boxes for their second leavening phase, ready to be transformed into individual pizzas.
Shaping and Topping the Pizza
The Dance of Dough Shaping by Hand
Now comes the part that truly separates the Neapolitan pizzaiolo from the rest: the shaping, or ‘ammaccatura’. This must, without exception, be done by hand. Rolling pins, presses, or any mechanical device are strictly forbidden. These tools would crush the delicate gas bubbles – the alveoli – painstakingly developed during fermentation, resulting in a dense, tough crust. Instead, the pizzaiolo uses their fingertips, starting from the centre and pressing outwards in a specific motion designed to gently push the fermentation gases towards the edge. This creates the characteristic raised rim known as the ‘cornicione’. The goal is a disk that is incredibly thin in the centre – no more than 0.25 cm (about 3 millimetres) according to the official definition – while preserving that puffy border which will become gloriously charred and airy in the oven. Learning to stretch the dough quickly and evenly without tearing it takes immense practice, but it’s a fundamental skill.
This hand-stretching technique is more than just a rule; it’s a legacy passed down through generations, a core part of the craft celebrated by maestros like Enzo Coccia and recognized by UNESCO. It connects the modern pizza back to its humble origins as street food in Naples – a far cry from the sweet, almond-filled ‘pizza alla Napoletana’ mentioned in some historical texts, as noted by Gastro Obscura, showing just how much culinary terms can evolve! Today’s pizzaiolo continues a tradition refined over centuries.
Dressing the Part The Philosophy of Toppings
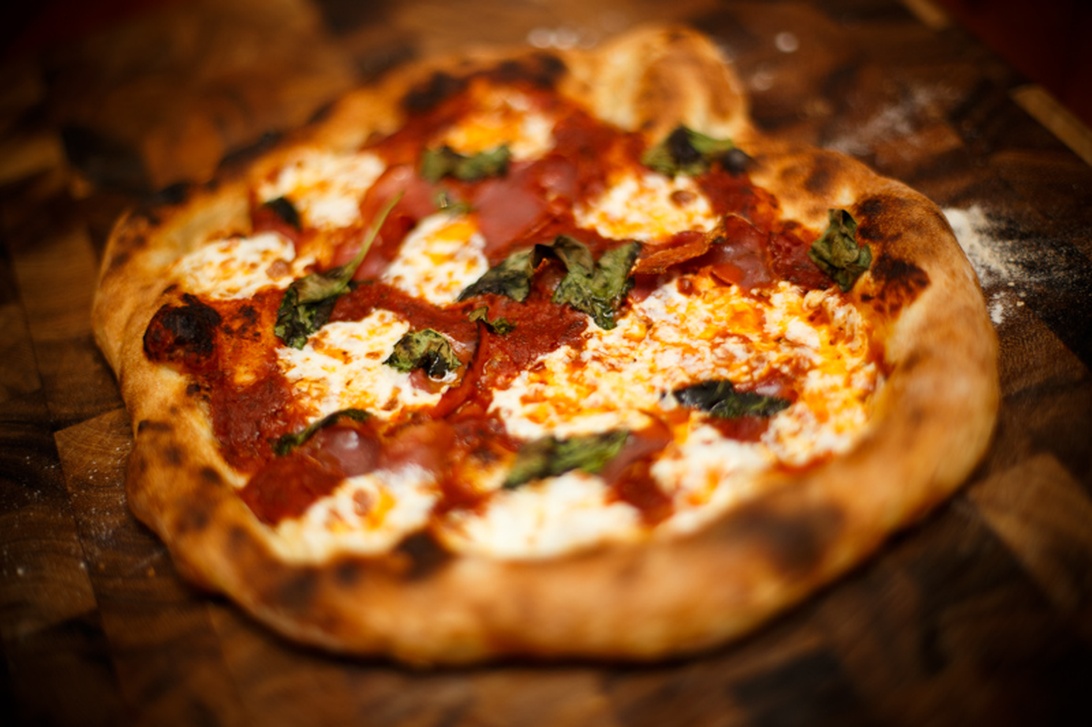
When it comes to topping a Neapolitan pizza, the philosophy is clear: simplicity reigns supreme. It’s about showcasing the quality of a few carefully chosen ingredients, allowing the flavour of the magnificent crust and the freshness of the toppings to sing in harmony. Overloading is sacrilege! The focus is on sourcing the best, ideally ingredients with roots in the Campania region. The two undisputed classics are the Marinara (simply tomatoes, garlic, oregano, and extra virgin olive oil) and the iconic Margherita. For a true Margherita, think sweet San Marzano tomatoes (preferably crushed by hand to maintain some texture, or high-quality peeled tomatoes), creamy Mozzarella di Bufala Campana DOP or a high-quality Fior di Latte (cow’s milk mozzarella), a few fresh basil leaves scattered post-bake, perhaps a whisper of grated hard cheese, and a final spiral of fragrant extra virgin olive oil.
Why such restraint? Because when you start with exceptional ingredients – sun-ripened tomatoes bursting with flavour, milky, delicate mozzarella, aromatic basil – you don’t need to mask them. Each element should be discernible, contributing to a balanced whole that complements, rather than smothers, the flavourful, slightly tangy crust beneath. It’s a world away from pizzas piled high with countless ingredients. In true Italian cooking, especially Neapolitan, the focus is on respecting the ingredients. For the sauce, a simple preparation focusing purely on high-quality tomatoes, like the approach detailed by Joshua Weissman, captures this essence perfectly.
The Crucial Role of the Oven
Trial by Fire The Wood-Fired Oven
We arrive at the final, dramatic act: the bake. And let there be no doubt, authentic Pizza Napoletana demands the intense, primal heat of a wood-fired oven, the ‘forno a legna’. We’re talking temperatures that domestic ovens simply cannot reach, typically soaring between 430°C and 485°C (that’s around 800°F to 905°F). These ovens, traditionally dome-shaped with a brick floor as detailed by resources like The Spruce Eats, are engineering marvels designed to radiate, convect, and conduct heat with incredible efficiency. The fire blazes on one side, the heat reflects off the dome, and the floor becomes searingly hot, ready to instantly start cooking the pizza base.
This inferno is the secret to the pizza’s rapid transformation, a mere 60 to 90 seconds from peel to plate. It’s this brief, intense exposure to heat that creates the magic: the beautiful ‘leopard spotting’ or ‘maculatura’ – those characteristic charred blisters – on the cornicione (which should be 1-2 cm high) and underside; the way the crust puffs dramatically while the centre remains soft, moist, and foldable; how the cheese melts perfectly and the toppings cook through without drying out. Watching a pizza bake in under 90 seconds is pure theatre, demanding the pizzaiolo’s constant attention as they use the peel to launch, rotate, and retrieve the pizza at the perfect moment. This specific cooking method is non-negotiable for authenticity.
Achieving Neapolitan Style at Home
Now, many wonder if it’s possible to replicate this at home without a dedicated wood-fired oven. While achieving the exact same result is challenging due to temperature limitations, you can get surprisingly close with a few adjustments. The key is maximizing heat. Crank your domestic oven to its absolute highest setting (usually 250°C-290°C or 500°F-550°F) and, crucially, preheat a pizza stone or, even better, a thick steel baking sheet for at least 30-60 minutes to store as much thermal energy as possible. This helps mimic the intense heat transfer from the floor of a wood-fired oven. Some guides, like the F&W pizza guide, even suggest using the broiler (grill) for the final minute or two to help char the top and cornicione – just watch it carefully to prevent burning! Recipes adapted for home ovens, like the one from BBC Food, offer a great starting point for experimenting. It won’t be *exactly* the same, but you can still achieve a delicious pizza with many Neapolitan characteristics right in your own kitchen.